Tuesday, April 29, 2014

Forgot Windows Server 2008/R2 Administrator Password - How to Recover


Forgot Windows Server 2008/R2 administrator password? You can recover your forgotten Windows Server 2008/R2 administrator password by certain means. But the key lies in that you should recover it most effectively and safely.

Windows Password Geeker is effective to reset forgotten password for both Windows and Windows Servers safely. It is now one of the most popular one for its user-friendly operations. You can give it a try first.

Step 1: Download Windows Password Geeker Advanced and install it.
Considering that you have forgotten your Windows Server 2008/R2 password already, you have to do this on another accessible computer.

Step 2: Run it and follow the on-screen steps to create a bootable Windows Server 2008 R2 password reset disk.
  • Insert a USB flash drive or CD/DVD as the media you wish to burn.
  • Select the inserted disk from the pull-down list and then click Begin burning button.
  • When you see Burning successfully, you have created a Windows Server 2008/R2 password reset disk. Take it out ready for use.

Step 3: Set Windows Server 2008/R2 boot from the USB or CD/DVD bootable password reset disk.

Step 4: Recover Windows Server 2008/R2 administrator password.
When the Windows Server 2008/R2 booted from the USB or CD/DVD password reset disk, Windows Password Geeker Advanced starts automatically.
  • Select the administrator account you forgot its password.
  • Click Reset Password button. Click Yes button when it prompts whether reset its password to Asunsoft@2012.
  • Click Reboot button when you see the password has been reset as Asunsoft@2012. Remove your Windows password recovery disk first and click Yes button to restart your Windows Server 2008/R2 computer right now.
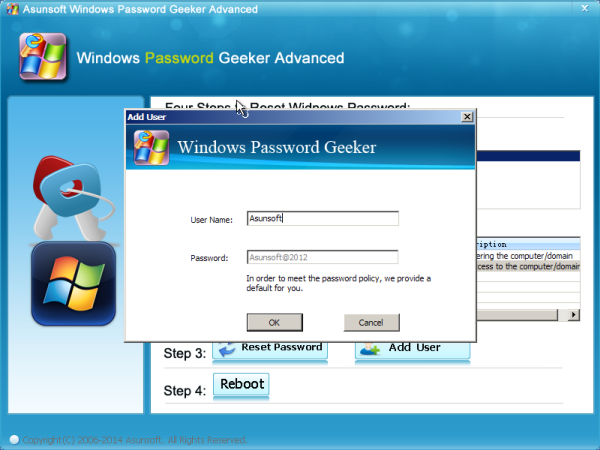
Besides Reset Password button, you may notice the button Add User. Yes, it supports to add a brand new user account with administrator privileges directly offline. When you forgot your Windows Server 2008/R2 administrator password, you can also create a new one to log in back again.

  • Click Add User button.
  • Input a user name for the administrator account to be added whose password is Asunsoft@2012 by default. Click OK button.
  • When you see the new account is added and shown, click Reboot button to restart your Windows Server 2008/R2.


Monday, April 28, 2014

Changing Password Policy Windows Server 2008 R2


Compared with former Windows Server 2003 or Windows Server 2008, Windows Server 2008 R2 has stronger policy for passwords. It is easier and more convenient for you to set a multiple password policies. You can set password policies to better guarantee its safety. Or on the other hand, if you don’t want to deal with the complex passwords that are required to meet the policy guidelines, you can change password policies on your Windows Server 2008 R2.

Here’s How to Change Password Policies under Windows Server 2008 R2

1. Open Run box, type gpedit.msc in it and press Enter key to open Local Group Policy Editor Console.
2. Expand Computer Configuration > Windows Settings > Security Settings > Account Policies.
3. Now expand Password Policy, after that, on the right you can see all the password policies you can set or change.
4. Right click on the policy you want to change its value, select Properties and then you can make changes to it.
You can make changes to them to enhance the security. For example,
Setting a number from 1 – 24 for Enhance password history policy.
Setting a number from 1 – 998 for Minimum password age policy.
Setting a number from 1 – 999 for Maximum password age policy.
Setting a number from 1 - 14 for Minimum password length policy. The longer, the better.
And enable Password must meet complexity requirements policy.
Or if you want to remove all these password annoyances, you can set the former three all to 0 and disable Password must meet complexity requirements policy.
5. You can make other changes according to your own requirements and your own will.

Thursday, April 24, 2014

NT Password Reset Disk to Reset Windows 7/8 Password


Forgot Windows 7 or Windows 8 password on your laptop or desktop? NT password reset disk is effective to reset forgotten password for Windows 7/8. You may wonder what NT password reset disk is and what the relation between Windows 7/8 and NT.
Now in this article, you can find answer to your confusions and learn how NT password reset disk to reset Windows 7/8 password.

What Is NT Password Reset Disk?
As we all know, Windows NT, launched by Microsoft in 1993, is network operating system for workstation, network server and large computer.

And NT password reset disk is a kind of bootable password reset disk especially created with the function to reset forgotten or lost password for all Windows NT serial systems.

Why NT Password Reset Disk Can Reset Windows 7/8 Password? (What’s the Relation between NT and Windows 7/8?)
By 2013, Microsoft has launched 14 Windows NT operating system altogether. Among which NT6.X contains a serial of network server operating systems including Windows Vista, Windows Server 2008, Windows 7, Windows Server 2008 R2, Windows 8, Windows 8.1 and Windows Server 2012. In this way, NT password reset disk undoubtedly can be applied to reset Windows 7/8 password and even other serial Windows OS password.

How NT Password Reset Disk Resets Windows 7/8 Password?
As for how NT password reset disk reset Windows 7/8 password, we have to create such a versatile NT password reset disk with a powerful enough related Windows password recovery tool first.

Asunsoft Windows Password Geeker happens to be such a versatile Windows password recovery program that allows you to create a bootable Windows password reset disk to reset password for All Windows systems.

Create a NT Password Reset Disk
1. Download and install Windows Password Geeker Advanced on another accessible computer with Internet.
2. Run the password recovery software, choose USB device or CD/DVD option first and then insert USB or CD/DVD correspondingly to burn the program into it.


3.About 30 seconds, it will prompt you that Burning Successfully. You have created a NT password reset disk and eject your USB flash drive or CD/DVD disk.

NT Password Reset Disk Created to Reset Windows 7/8 Password
1. Insert the created NT password reset disk into locked Windows 7/8 computer.
2. Start or restart the computer. Set it boot from the NT password reset disk by changing its first boot order.You can refer to the guide set computer boot from USB or CD/DVD
3. When the Windows Password Geeker Advanced run automatically, follow the prompts to select the target user account under Windows 7 or Windows 8 system.
4. Click Reset Password button. When a prompt message appears, click Yes button to reset its password to blank.
Immediately, your Windows 7 password or Windows 8 password has been reset as Blank shown in the list.
5. Eject your USB flash drive or CD/DVD disk and click Reboot button to restart your computer.

Wednesday, April 23, 2014

How to Recover Windows 8 Password on VMware


Forgot Windows 8 password on your VMware? How can you recover it? In fact, to recover Windows 8 password on VMware is quite similar to the operation on host computer, even much easier. Here this tutorial will walk you through how to recover Windows 8 password on VMware step by step.
                                                         
Step 1. Download and install Asunsoft Windows Password Geeker Advanced on your host computer. After installation, in the Asunsoft Windows Password Geeker Advanced folder you will find the ISO file of the software.

 Step 2. Launch your VMware workstation and select the Windows 8 you have forgotten its password. Right click on Windows 8 and select Settings item.

Step 3. Select CD/DVD (IDE) option. On the right, check Connect at power on box. Meanwhile, select Use ISO image file, click Browse button to load the windows password geeker advanced iso image file from your host computer and click Ok button to save the changes.
 Step 4.Click VM menu, swipe on Power option and then select Power On to BIOS to enter BIOS Setup Utility directly after power on.
Step 5. Use arrow key to select Boot tab, later use to select CD-ROM Drive and move it to the first place using + key to set it as the first boot device.
 Step 6.Press F10 to save the changes and exit the BIOS Setup Utility.
 Step 7.Windows Password Geeker Advanced will start automatically and shows you its password reset interface. Select the target user account under Windows 8 system and then click Reset Password to reset its password to blank.
Step 8. When the password has reset as Blank, click Reboot to restart the Windows 8 in VMware and then you can login your Windows 8 on VMware without a password.
Note: Make sure it reboots from the virtual hard drive, or else it will boot into Windows Password Geeker Advanced again. To avoid that, you can easily click VM > Removable Devices > CD/DVD (IDE) > Disconnect to let it boot from virtual hard drive normally.

Tuesday, April 22, 2014

Three Most Easy Tricks to Enable Default Administrator Account on Windows 7/8


There is a default administrator account generated on Windows 7/8 when you install Windows 7 or Windows 8, but you cannot find it in the list of all the user accounts from Control Panel or from the log in screen. That’s because it is disabled by default. But if you have to use it to troubleshoot something, there are three most easy tricks available to enable default Administrator Account on Windows 7/8.

Before Default Administrator Account on Windows 7/8 Enabled

Before default Administrator account is enabled on your Windows 7 or Windows 8, you cannot detect it from Control Panel.
Or from the listed user accounts you can switch between in the login screen.

Three Easy Tricks to Enable Default Administrator Account on Windows 7/8

Tip: To successfully adopt either ways below, you have to login an account with administrator privileges. And the default Administrator doesn't have a password by default, so it is wise to set a strong password for its security instantly you enable it.

Enable Default Administrator Account on Windows 7/8 with cmd

1. Run Command Prompt as administrator.
On Windows 7: Click Start button and type cmd in the Search box. Then right click on cmd and choose Run as administrator. Or you can press Ctrl + Shift + Enter key simultaneously to open Command Prompt window.


On Windows 8: Swipe the mouse cursor to the bottom left corner to bring up the thumbnail of desktop interface or morden interface, right click on it and choose Command Prompt (Admin) option.


2. Type in the command: net user Administrator /active:yes and press Enter key.
Then you can see a message prompts that the command completed successfully.

Enable Default Administrator Account on Windows 7/8 from Local Users and Groups

1. Open Local Users and Groups window.
On Windows 7: Click Start button, type lusrmgr.msc in the Search box and press Enter key.
On Windows 8: Press Windows + R key to open Run box. Type lusrmgr.msc in the Run box and press Enter key.

2. Expand Users folder, right click on the Administrator account and select Properties item.


3.Uncheck the Account is disabled box.


4. Press OK button to save the changes.
<

Enable Default Administrator Account on Windows 7/8 from Local Security Policy Editor

1. Open Local Security Policy window.

On Windows 7, click Start button, type Local Security Policy in the Search box and press Enter key.
On Windows 8, press Windows + R keys to open Run box. Type secpol.msc in it and press Enter key.

2. Expand Local Policies folder and then Security Options folder.
3. On the right, you can see the policy Accounts: Administrator account status. You double click on it.

4. In Accounts: Administrator account status Properties dialog box, you select Enabled value.

5. Click OK button to save the changes.

After Default Administrator Account on Windows 7/8 Enabled

After default Administrator account is enabled on your Windows 7 or Windows 8, you can see it in the list of all your user accounts from Control Panel.
Or see it in the log in screen with which you can log in.

How to Set and Cancel Power-on Password for Dell Laptop

If you have a Dell laptop, it cannot be too careful to set a power-on password for it to guarantee its safety. Now here in this article, we will focus on three means to allow you to set a power-on password for your Dell laptop. Having known how to set a password already, you’d better know how to cancel it meanwhile to avoid unnecessary troubles.

Broadly speaking, power-on password can be divided into three types: Windows login password, system startup password and BIOS password.

Set and Cancel Windows Login Password for Dell Laptop

Windows login password is one of the most commonly adopted and most familiar shields against unauthorized access. It is the easiest to set and cancel just roughly like the followings:
1. Enter Control Panel.
If you run Windows 7/Vista/XP, you click Start button and then select Control Panel.
If you run Windows 8.1/8, you can press Windows + X keys to bring up Start menu and select Control Panel.
2. Click User Accounts and Family Safety link > User Accounts link > Select your target account.
3. Click Create a password link.
4. Input a new password and input again to confirm the new password.

5. Click Create password button to save the changes.

If you want to cancel the Windows login password you set, you can cancel it just similar to you create one.
1. Do as the above 1 and 2 steps.
2. Click Remove the password link.
3. Click Remove Password button in the Remove a password screen.

Set and Cancel System Startup Password for Dell Laptop

System startup password is more secure one to ensure the safety of your system. It will be prompted instantly you power on your Dell laptop before the system can even boot up and load the operating system. Only after you input the correct system startup password, can you enter the Windows login screen and login with the correct user name and login password. Thus, your system has double protection.
1. Open Run box.
Click Start button and choose Run if you run Windows 7/Vista/XP.
Press Windows + R keys simultaneously to open Run box if you run Windows 8.1/8.
2. Type Syskey in the Run box and press Enter key.
3. Click on the Update button in the Securing the Windows Account Database dialog box.
4. Select Password Startup in the Startup Key dialog box. Input a password you decided and confirm it.
 
5. Click OK button to save it.

If you want to cancel the system startup password you set, you can cancel it just similar as you set one.
1. Do as the above 1 – 3 steps first.
2. Select System Generated Password in the Startup Key dialog box.
3. Select Store Startup Key Locally option.
4. Click OK button and input the current system startup password to save the password to the hard drive.

Set and Cancel BIOS Password for Dell Laptop

1. Boot up your Dell laptop and enter BIOS Setup Utility by pressing F2 key.
2. Use arrow key to choose Security tab in the BIOS Setup Utility screen.
3. Under the Security tab, you are allowed to set two types of BIOS password, Set User Password and Set Supervisor Password respectively.
Supervisor Password controls access to the setup utility, which means that you have to enter this password whenever you are trying to enter BIOS Setup Utility and make any BIOS setting changes.
User Password controls access to the system at boot, which means that you have to enter this password whenever you are trying to start the system.
4. Press Enter key to input a desired Supervisor Password, confirm it and then press Enter key to continue.
Note: Set Supervisor Password option is selected by default, and if you cannot move to Set User Password option, it means that you have to set a Supervisor password first.
5. After you have set a supervisor password, you can move to Set User Password option. Use arrow key to select Set User Password and press Enter key.
6. Input, confirm your desired User Password and then press Enter key to continue.
Note: When you see that the status of Supervisor Password and User Password changes from Clear to Set. You have set a password for your system at boot successfully.
7. Press F10 key to save the changes and exit the BIOS Setup Utility.


If you want to cancel the two types of BIOS passwords you set, you can cancel them just similar as you set them.
1. Boot up your Dell laptop and press F2 soon and repeatedly to enter BIOS Setup Utility.
2. Enter the Supervisor Password you set when you trying to enter BIOS Setup Utility.
3. Use arrow key to choose Security tab in the BIOS Setup Utility screen.
4. Select Set User Password or Set User Supervisor Password option and press Enter key.
5. Enter you current password. Later press Enter key twice directly when asked to enter new password and confirm new password.
6. Press Enter key to continue and then you will see the status of Supervisor password or User Password changes from Set to Clear.
7. Press F10 key to save the changes and exit BIOS Setup Utility.

Monday, April 21, 2014

Is There a Default Password for Windows 8 Administrator Account?

I was locked out of Windows 8 because of forgetting password to my only administrator account and hear that there is a built-in administrator account whose password is blank by default. Is that true? Is there really such a default password for Windows 8 administrator account?

The answer is that there is a built-in account for administering but it is disabled and hidden by default. Before you activate it, it has no password. You can set a password for it whenever you activate it.

In this way, if you want to reset your forgotten Windows 8 administrator password via built-in administrator, the premise is that you have activated your built-in administrator account already before you forgot your Windows 8 password.

Activate Windows 8 Built-in Administrator Account

You cannot see the Administrator account from Control Panel and cannot login with it until you activated it. Just in case and for convenience, you can enable and activate it easily as below:
1. Log in your Windows 8.
2. Swipe the mouse cursor to the upper or lower right corner to bring out Charm bar. Click on Search icon, type in cmd in the Search box and press Enter key.
3. Right click on the result to run cmd as administrator.
4. Click Yes button on the User Account Control window.
5. Type in the command: net user Administrator /active: yes and press Enter key to execute.
Similarly, you can type the command: net user Administrator /active: no to cancel the activation.
6. Optionally you can type in the command: net user Administrator 123456 and press Enter to set a password for it.
You can check whether it is activated successfully from Control Panel. And then you can login your Windows 8 with it to reset forgotten administrator or other user account password easily from Control Panel.

If you are trying to reset or recover forgotten Windows 8 administrator password via Windows 8 default blank administrator but unfortunately you haven’t activate it before, there are many Windows password recovery programs can do you a favor, among which Asunsoft Windows Password Geeker is a most professional and reliable one worth your try. You can reset or recover your Windows 8 password roughly like the followings.
1. Use another accessible computer with Internet to get the full version of Windows Password Geeker Advanced and then install it.
2. Run the installed Windows Password Geeker Advanced to create a bootable Windows 8 password reset disk.
  • Choose USB device or CD/DVD.
  • Insert a USB flash drive or CD/DVD disk correspondingly and then select it from the pull-down list.
  •  Click Begin burning button to start burning.
3. Transfer the USB flash drive or CD/DVD disk into your locked Windows 8 computer and set the computer boot from the USB or CD/DVD disk.
  • Boot the computer and press Boot Menu key prompted as soon as possible before the start up screen appears to enter Boot Menu.
  • Select USB Hard Disk/Removable Devices or CD/DVD-ROM Drive option and press Enter key.
4. Reset or recover forgotten Windows 8 password.
  • Select the target user account on your Windows 8 system.
  • Click Reset Password button and then click Yes button when a prompt message appears.
  • Click Reboot button when you see its password has been reset as Blank. Eject the USB flash drive or CD/DVD disk and then click Yes button to confirm restarting when a prompt message appears.


Thursday, April 17, 2014

How to Make a Boot Disk for Windows 7


Boot disk allows you to boot into Windows, either to diagnose and fix problems or to install a Windows system. You can create kinds of boot disk with various functions depending on the software ISO image file you burn to.

Here in this article we demonstrate how to make a boot disk for Windows 7 by burning Windows 7 installation ISO image file to a USB flash drive or CD/DVD disk which would come in handy when your original Windows 7 installation disk damaged or lost.

Requirements:
  • Have Windows 7 installed on your computer
  • Windows 7 Installation ISO image file
  • An available USB flash drive with at least 4 GB in size or an available CD/DVD disk
  • Professional ISO image file burning tool – Finalbooster 

Here’s How to:
1. Download and install the professional ISO image file burning tool – Finalbooster. You can find it from www.asunsoft.com.
2. Locate the Windows 7 installation ISO image file on your computer. Or if you don’t have one, you can download from Microsoft official website and save it to a specific location.
3. Run the installed Finalbooster. Click Browse button in its main interface to select the Windows 7 ISO image file.
4. Insert a USB flash drive or CD/DVD disk into your computer. Click Burn to USB or Burn to CD/DVD button correspondingly. Here we take Burn to USB as an example. After that it will start burning the ISO image file and will take a short while to finish.
Note: Use a totally new USB flash drive or CD/DVD disk or backup the contents in it because it will be formatted when burning the ISO image file into it.
5. When it prompts Burning Successfully, you have made a bootable installation disk for your Windows 7 and can use it as an installation disk to install Windows 7.

Wednesday, April 16, 2014

Help! Forgot Windows 7 Administrator Password


Need a way around password on administrator account in windows 7 new machine and during setup password was entered accidentally and don’t know it.  Data from old machine is transferred, so I do not want to do a complete re-install of operating system, or i will lose data. HELP!!!!!!!!!!

Are you encountering similar situation that you forgot your Windows 7 Administrator password? What’s worse, if it is the only one administrator account, it means you would lose administrator privileges over your Windows 7 computer and cannot freely to install or uninstall a software, update drivers or access to files need administrator privileges.

Here provides two small and feasible countermeasures toward forgetting Windows 7 administrator password.

Remove Forgotten Windows 7 Administrator Password
If you forgot Windows 7 administrator password, personally, I think removing the old forgotten password is the brightest and most direct way.

Because you have forgotten administrator password, so removing from Control Panel becomes impossible. But you can remove forgotten administrator password with a third-party tool just like removing a lock with a handle.
Step 1: Download and install Windows 7 Password Geeker on another accessible computer first.
Step 2: Create a Windows 7 password reset disk by burning the software into USB flash drive or CD/DVD disk. Choose USB device or CD/DVD, and correspondingly insert a USB flash drive or CD/DVD disk, and then click Begin burning button.
Step 3: Transfer that USB flash drive or CD/DVD disk loaded with Windows 7 Password Geeker into locked Windows 7 computer and set the computer boot from the USB or CD/DVD.
Step 4: When locked Windows 7 computer booted from the USB or CD/DVD, Windows 7 Password Geeker will start automatically and shows you its password reset interface.
Step 5: You select the user name corresponding to your administrator account and click Reset Password button to reset its password to blank.
Step 6: Click Reboot button to restart the computer. Eject your USB flash drive or CD/DVD disk and click Yes to confirm restarting.
Now you have removed your forgotten Windows 7 administrator password and can login back without password.

Tip: For safety’s sake, after login your Windows 7 computer, this time you can set a secure password by following principles. And, create a password reset disk for it right after create the new password.

Bypass Forgotten Windows 7 Administrator Password by Creating a New Administrator Account
You would ask that generally we create a new account from Control Panel by Administrator account, how could we create a new administrator account when cannot login with our administrator account. Windows 7 Password Geeker again, besides removing forgotten password, it supports creating a new administrator account without log in.
Do Step 1 to Step 4 just as above.
Step 5: When you are in Windows 7 Password Geeker password reset interface, you directly click Add User button.
Step 6: Type in a new User Name and its new Password. Click OK button to save.
Step 7: Click Reboot button when you see the newly added account is shown. Eject your USB flash drive or CD/DVD disk and click Yes to confirm restarting.
Login your Windows 7 computer with the newly created user account and its new password.