Friday, May 30, 2014

Make Your Computer Boot from USB Flash Drive or CD/DVD Disk


A computer can boot from a floppy drive, a hard drive, a CD/DVD-ROM drive or other removable devices. Generally, computer boots from its internal hard drive normally. But occasionally, we may have to make it boot differently either from a USB flash drive or CD/DVD disk to troubleshoot certain problems or for other purposes.

Commonly, you can make your Windows computer boot from USB flash drive or CD/DVD disk via two means: Boot Menu or BIOS.

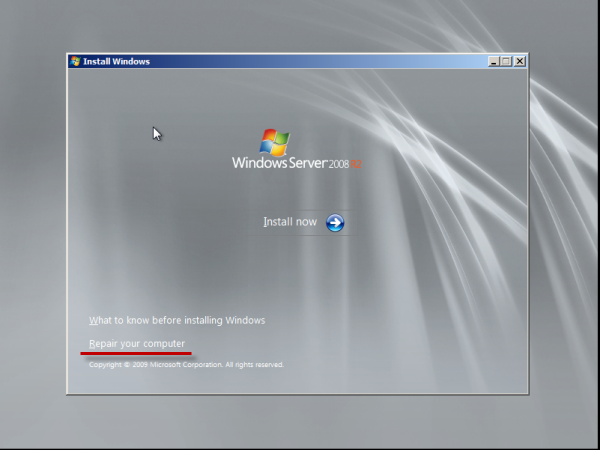
Boot from USB flash drive or CD/DVD-ROM from Boot Menu

1. Insert the bootable USB flash drive or CD/DVD disk into your computer, and restart your computer.
2. When its first screen pops up, you get a prompt saying “Press F9/F12/Esc/F11 key to enter Boot Menu.”(The key to press differs with your computer brand and computer motherboard but generally ranges from F9/F12/Esc/F11).

Note: You may miss the best time to press the corresponding key to enter Boot Menu, so you may have to repeat this practice over times. It is very important to hit the correct key at the right time.

3. Now you are in the Boot Menu screen and provided with several first boot devices.
Highlight the USB Hard Disk/Removable Devices to make your computer to boot from USB flash drive.
Or highlight CD/DVD-ROM to boot from CD/DVD disk.
4. Press Enter key and your computer will boot from your USB flash drive or CD/DVD disk accordingly.

Boot from USB flash drive or CD/DVD-ROM from BIOS

BIOS is short for Basic Input and Output System, whose main function is to provide the lowest and the most direct hardware setup and control and from where users can make changes to some basic computer functions including changing booting order.
1. Insert the bootable USB flash drive or CD/DVD disk into your computer, and restart your computer.
2. Instead of noticing the prompt to enter Boot Menu, this time you have to focus on the prompt that Press BIOS key to enter BIOS. (Most common and popular BIOS keys are Del, F1, F2, F10, you should press the right key according its prompt.)
3. When you are in BIOS Setup Utility, select the Boot tab.
4. Under Boot tab, you can see all first boot devices can be chosen.
Select Removable Devices and use “+” /“-” to move it to the top to set it boot from USB flash drive.
Or select CD-ROM Drive and use “+”/“-” to move it to the top to set it boot from CD/DVD disk.
5. Now press F10 to save the changes and exit out of the BIOS.
6. Your computer will boot from the bootable USB flash drive or CD/DVD disk. When prompted “Press any key to boot from CD/DVD”, do as prompted so that your computer will boot from the USB flash drive or CD/DVD disk instead of hard drive.

Monday, May 26, 2014

Forgot Windows 8 Admin Password to Acer Laptop


Forgot Windows 8 Admin password to your Acer laptop? Lost all administrative privileges to install desired programs, change basic settings whatsoever? This article gives you as many effective solutions as possible to deal with Windows 8 admin password forgetting problem on Acer laptop.

Reset Forgotten Windows 8 Administrator Password with Password Reset Disk Created Before
Precondition: You have created such Windows password reset disk before you forgot your Windows 8 administrator password.
First, Click OK when it prompts username or password is incorrect.
Then, you click Reset password link under the password box.
Next, you follow instructions step by step in Password Reset Wizard to reset a new password for your Windows 8 administrator password.
Reset Forgotten Windows 8 Administrator Password with Extra Administrator Account
Precondition: There are more than one administrator accounts created on your Acer laptop.
1. You click Switch User to login with another administrator account.
2. After you log in, right click on the Computer icon and select Manage item.
3. Expand Local Users and Groups and then Users folder right after.
4. Right click on the administrator account and select Set Password button.
5. Reset forgotten Windows 8 administrator password.
Remove Forgotten Windows 8 Administrator Password with Asunsoft Windows Password Geeker Advanced
Precondition: You have to use another accessible computer to get the full version of Asunsoft Windows Password Geeker Advanced.
Step 1: Download and install the full version of Asunsoft Windows Password Geeker Advanced on another computer.
Step 2: Run it and follow guide to create a password reset disk with USB flash drive or CD/DVD disk.
Step 3: Transfer the created password reset disk into locked Acer laptop and boot laptop from it. Details see How to boot computer from USB flash drive.
Step 4: Now, follow the instructions to remove forgotten Windows 8 administrator password step by step.
Reset Forgotten Windows 8 Administrator Password with Windows 8 Installation Disk
Another choice you have is to find out the installation disk with which you install your Windows 8. Well, with it, you won’t take the trouble to reinstall the system but to reset your forgotten Windows 8 administrator password. Feel fresh, right?
1. Insert your Windows 8 installation disk into your Acer laptop and set your Acer laptop boot from the installation CD/DVD from BIOS Setup Utility or Boot Menu.
2. When your Acer laptop successfully booted from the installation CD/DVD, you come to the Windows Setup screen selecting language and other options, here you press Shift + F10 keys directly to open Command Prompt window.
3. Type in the command: copy c:\windows\SYSTEM32\sethc.exe c:\ and press Enter key to copy sethc.exe file and move it from the directory c:\windows\system32 to directory c:\.
Tips:
  • If you get the error message that The system cannot find the specified path, try to replace “c” with “d” or other possible drive letters.
  • Please notice that the word “SYSTEM” is capital sensitive, and just make sure it is the same with the title of the Command Prompt window.

4. Next type in the command: copy /y c:\windows\SYSTEM32\cmd.exe c:\windows\SYSTEM32\sethc.exe and press Enter key to replace the sethc.exe file with cmd.exe file.
5. Close the Command Prompt window and Windows Setup window to restart your Acer laptop.
6. When it restarts to Windows 8 log in screen, you press Shift key 5 times continuously and you should see the Command Prompt window again.
7. Type in the command: net user [username for your administrator account] [new password] and press Enter key to reset your Windows 8 administrator password.
For example, Asunsoft is the username for your administrator account, you type in net user Asunsoft 123456 to reset its password to 123456.
8. Now you close the Command Prompt window and log in to your administrator account with the newly reset password.
9. After you login again successfully, you have to do some restore. To move the original sethc.exe file back to the directory c:\windows\SYSTEM32 to replace the cmd.exe file with the command: copy/y c:\sethc.exe c:\windows\SYSTEM32\sethc.exe.

Whatever, select one most suitable and easy one according to your own situations.

Wednesday, May 21, 2014

Reset Local Administrator Password for Windows Server 2008 R2


Hi, there! I have forgotten windows 2008 R2 local admin password, the server is not in domain, is there any way to reset local administrator password?
This is a question raised from Windows Server General Forum, so have you encountered the same problem and are seeking for solutions? Here introduce two effective options to reset local and domain administrator password for Windows Server 2008 R2 sparing you from worry about Windows Server 2008 R2 password forgetting problem.


Option 1: Windows Server 2008 R2 Installation Disk/ISO Image File

Using Windows Server 2008 R2 installation disk/ISO image file to reset forgotten Windows Server 2008 R2 local administrator password is the built-in method in Windows Operating System.
1. Boot the locked Server from the Windows Server 2008 R2 installation disk/ISO image file.
2. Choose preferences like language and then click Next button to go on.
3. Click on Repair Your Computer link.
4. Select your Partition and Installation Version and then click Next button.
5. Click Command Prompt link.
6. Type in the command: MOVE D:\windows\system32\Utilman.exe D:\windows\system32\Utilman.exe.bak and press Enter key to back up the utilman.exe file first.
7. Next type in the command: COPY D:\windows\system32\cmd.exe D:\windows\system32\Utilman.exe and press Enter key to copy cmd.exe file and rename it utilman.exe.
8. Close Command Prompt window and restart your Server. When it comes to the login screen, you click the icon of Ease of access to enter Command Prompt window again.
9. Type in the command: net user administrator Asunsoft@2012 and press Enter key to reset your forgotten password to Asunsoft@2012.
10. After login in with the newly reset password, remember to delete the Utilman.exe file and rename Utilman.exe.bak file back to the original Utilman.exe under corresponding directory.

Option 2: Freshly Create a Windows Server 2008 R2 Password Reset Disk

If you cannot find your Windows Server 2008 R2 installation disk compatible or you have failed in its operations, you can turn to this option for its easier operations comparatively.
1. Get Asunsoft Windows Password Geeker Advanced, download it and install it on another accessible computer first.

It is powerful and almighty to reset local and domain password for all Windows system including Windows Server 2008/R2.

2. Run the installed Asunsoft Windows Password Geeker to create a Windows password reset disk following its instructions.
Choose USB device or CD/DVD as the media to burn the password reset disk.
Insert a USB flash drive or CD/DVD disk accordingly, select it from the drop-down list and then click Begin burning button.

Click OK button when Burning successfully and then you can take it out.


3. Insert the burned USB flash drive or CD/DVD disk into your locked Server computer and set it boot from the disk.

4. When your computer booted from the created Windows password reset disk, you come to the password reset interface now.
Make sure the system is Windows Server 2008 R2 if there is more than one system installed.
Select the target administrator account you forgot its password.
Click Reset Password button and click Yes button to reset its new password to Asunsoft@2012 by default.
Click Reboot button when you see the password has been reset as Asunsoft@2012eject your USB flash drive or CD/DVD disk first to prevent the computer booting from it again and then click Yes button to restart.

Monday, May 19, 2014

How to Create a Guest User Account on Windows 8


Windows 8 allows you to share your PC with others, but if they share your computer with the same account, your account would have risk of information leaking, settings changing, files deletion, undesired programs installation and so on. So how you make the best of both worlds to share your computer with others safely? Why not create a guest user account on your Windows 8 which only has limited permissions for infrequent users?

How to Create a Guest User Account on Windows 8

To create a guest user account on Windows 8:
1. Login Windows 8 with an administrator account which would have administrator privileges to create other user accounts.
2. Press Windows + C keys simultaneously or swipe the mouse cursor to the upper or lower right corner to bring out sidebar.
3. Click on Settings icon and then click on Change PC settings.
4. Click on Users item on the left.
5. Click on Add User option on the right under Other users, then you will be at Add a user screen.
There you can create a Microsoft account by entering an email address or click on Sign in without a Microsoft account link to create a local user account if you don’t want to create a Microsoft account. Here we take creating a local account for an example.
6. Click on Local account button to input information you want to use for the to-be-created local account like user name, password and password hint.
7. Click Next button to finish it.
8. Click Finish button when you can see the confirmation screen.

Sunday, May 18, 2014

How to View IP Address on My Computer (Windows 8/7/XP/Vista/2012/2008/2003)


When you have to view the IP address on your computer but totally at a loss? Now here introduce two approaches for you to view IP address on your own computer.

With the two approaches, I have successfully viewed my IP address on Windows 8/7 and Windows Server 2012/2008. That's extraordinarily easy. You shouldn’t have any difficulties.

Approach One: View IP Address from Command Prompt
1.Open Command Prompt window. 
  • For Windows 7/XP/Vista/Windows Server 2008/2003, Press Windows + R keys simultaneously to open Run box, type in “cmd” and press Enter key.
  • For Windows 8 and Windows Server 2012, Press Windows + X keys simultaneously and select Command Prompt directly.

2. Type in “ipconfig” in the popped-up Command Prompt window and press Enter key.

3. Now navigate to the item “IPv4” item and on the right of it, you can view your IP address on your Windows computer.
Approach Two: View IP Address from Network Center
1. Swipe your mouse to the right bottom of the taskbar.
2. Click (right click for Windows 8 and Windows Server 2012) on the small networking icon and select Open Network and Sharing Center link.


3. Select Change adapter settings on the left.

4. Double click on the network card we want to view its IP address. Click Details button in the popped-up window.
5. Now you can view your IP address here.

Monday, May 12, 2014

How to Format USB Flash Drive on Windows 8


Normally we have to beware of formatting our USB flash drive for we use it to store or transport some useful and important but not large amount of data because it is small, portable and convenient to carry. But if its available space is limited and you want a clean drive to store your files on, you can easily format your USB flash drive directly instead of deleting the existing files one by one troublesomely.

Now this article illustrates you how to format your USB flash drive on Windows 8 easily.

Note: Before you perform the following operations, please make sure that there are no important data in your USB flash drive or you have backed up them already.

Step 1: Plug your USB flash drive into your Windows 8 computer. And the computer will detect and recognize it as a removable disk drive automatically.
Step 2: Open Computer and right click on the corresponding removable disk drive you plugged in it displays. Select Format item.
Step 3: Format Removable Disk dialogue box would appear.
Step 4: Customize the specifications to format your USB flash drive.
Leave the Capacity as it is. Your computer is more accurate than you.
Under File system, you select FAT 32 option for it is the most compatible one.
Leave Allocation unit size as default.
Check Quick Format voluntarily on your own.
Step 5: Click Start button after you have finalized your selections.
Step 6: Click OK button to confirm formatting when it prompts you that formatting will erase ALL data on this disk.
Step 7: Soon the Format process will be completed according to your specifications. And you have formatted your USB flash drive on Windows 8 successfully.

Monday, May 5, 2014

Windows Command for Windows 8


There are mounts of commands under Windows, and this article aims at introducing some Windows commands most commonly and frequently used for Windows 8 which can help you quickly locate features or applications to customize operative system environment.

Command
Function
compmgmt.msc
Run Computer Management
devmgmt.msc
Run Device Manger
diskmgmt.msc
Run Disk Management
eventvwr.msc
Run Event Viewer
fsmgmt.msc
Run Shared Folders
gpedit.msc
Run Local Group Policy Editor
lusrmgr.msc
Run Local Users and Groups
perfmon.msc
Run Performance Monitor
rsop.msc
Run Resultant Set of Policy
secpol.msc
Run Local Security Policy
services.msc
Run Services
winver
Check your Windows version
dxdiag
Run DirectX Diagnostic Tool
msconfig.exe
Run System Configuration
cmd.exe
Run Command Prompt
chkdsk.exe
Check Disk
cleanmgr
Disk Cleanup to check free space on (C:)
iexpress
To create a self-extracting/ self-installing package
taskmgr
Run Windows Task Manger
nslookup
IP address detector to check IP address
regedit.exe
Run Registry Editor
utilman
Enter Ease of Access Center directly
powershell
Run Windows Powershell
Syskey
Run Securing the Windows Account Database
If the listed ones don’t come to the range you need, no worry, there are still other more useful commands you can find out. Welcome makes a supplementary to the list in the Comment section.