Friday, March 21, 2014

How to Access an Encrypted File or Folder in Windows 7 and Windows 8


Under what situations that you may lose access to your own encrypted file or folder in Windows 7 or Windows 8? If you try to get access to your encrypted file or folder and got an error message saying that Access is denied. It is either because you have no permissions to access or need encryption key. Under such situations, you can find out the reason first and then attempt to access to the encrypted file or folder accordingly.

Reason: Have No Permission
Check the permissions of the file or folder:
Right click on the file or folder and choose Properties option.
Select the Security tab.
Click a user name or group under Group or user names. And the permissions for the selected user or group are shown in the lower portion of the properties dialog box.

Solution: If it shows you have no permission to access to the file or folder, then you have to contact the one have permission, generally may be system administrator.

Reason: Need Encryption Key
If it is not because of permission but because the file or folder is encrypted and you lost your access to your encrypted file or folder because the encrypted file is from another hard disk, or have installed a new operating system or upgraded your current operating system, or your current one fails, then you have to export or import the certificates and private keys to gain access.

Solution: Export Certificates and Private Keys
Export Certificates and Private Keys: for the encrypted file or folder from external hard disk or another computer, so you have to export the encryption key from the computer where you encrypted the file first and then transfer it to current computer.

1. Enter Control Panel and search for Certificate Manager and open it.
2. On the left pane, expand Personal folder and click Certificates, and then click the EFS certificate that you want to export.
3. Click the Action menu, point to All Tasks and then select Export item to bring up the Certificate Export Wizard window, click Next button to continue.
4. For Certificate Export Wizard, you click Yes button, export the private key and then click Next button.
5. Click Personal Information Exchange and then click Next.
6. Type the password you want to use, confirm it and then click Next.
7. Navigate a location (a removable media, such as a floppy disk or USB flash drive is recommended) to store the certificate, type a file name and then click Save.
8. Click Next and then later click Finish.

Import Certificates and Private Keys: If you have backed up your certificates and private keys before or receive a certificate from other computer.

1. Enter Control Panel and search for Certificate Manager and open it.
2. On the left pane, expand Personal folder and click Certificates, and then click the EFS certificate that you want to import.
3. Click the Action menu, point to All Tasks and then select Import item to bring up the Certificate Import Wizard window, click Next button to continue.
4. Navigate to the file that contains the certificate and then click Next.
5. Type the password, select Mark this key as exportable check box (never Strong private key protection) and then click Next button.
6. Click Place all certificates in the following store, choose Personal store and click Next button.
7. Soon later, click Finish button.

Tuesday, March 18, 2014

How to Reset Forgotten Windows 8 Password on VMware


Install a Windows 8 system on your VMware for better learning and familiarizing it before you upgrade your system to Windows 8 in your physical computer? But forgot its password and be locked out of the Windows 8 VMware? This article illustrates you how to reset forgotten Windows 8 password on VMware easily.

Step One: Download and install Asunsoft Windows Password Geeker Advanced in your host computer. In the installation folder, locate the Windows Password Geeker Advanced ISO file.
Step Two: Return to VMware Workstation, click VM menu and select Settings option.
Step Three: Choose CD/DVD (IDE) item. On the right side, check Connected at power on and select Use ISO image file. Click Browse to load the Windows Password Geeker Advanced ISO file and then click OK to save all the changes.
Now restart your Windows 8 Virtual Machine and set it boot from the Windows Password Geeker Advanced ISO image file.
Step Four: Press Esc key as soon as possible you see the prompt message to enter Boot Menu. Use ↓ key to select CD-ROM Drive option and press Enter. Then the Windows 8 boots from the Windows Password Geeker Advanced ISO image file.

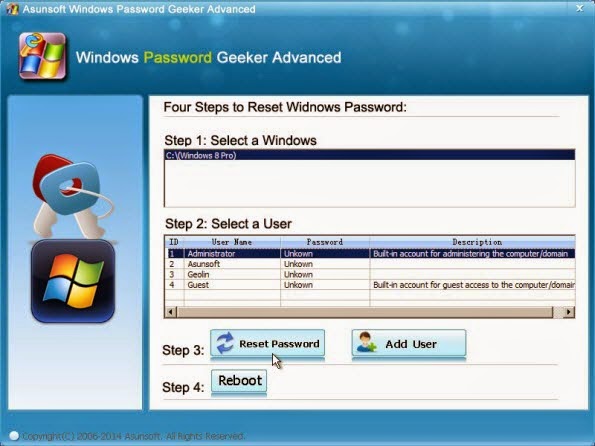
Step Five: Reset forgotten Windows 8 Password. Select the target user account under Windows 8 system you want to reset its password. Click Reset Password button to reset its password to Blank. Then click Reboot button to restart your Windows 8 Virtual Machine.
Note: Make sure it reboots from the virtual hard drive, or else it will boot into Windows Password Geeker Advanced again. To avoid that, you can easily click VM > Removable Devices > CD/DVD (IDE) > Disconnect to let it boot from virtual hard drive normally.


After restarting, you have successfully reset your forgotten Windows 8 password on VMware.

Monday, March 17, 2014

How to Log in Network Shared Folder with another New User and Password on Windows 8


There are many situations where we share folders in our computer with others for convenience, for example, you can realize resources sharing with coworkers through network shared folders in your work. But some resources are not open to all people, and thus we set password for those informative shared folders.

When you first access to certain password-protected network shared folder under Windows, you are required to type in correct user name and corresponding password to login in. Then the Windows will record the logged-in user and password as the default one. But some different folders under the same IP address may ask different user name and password to access, then how to log network shared folder with another new user and password? Let’s take Windows 8 as an example to illustrate.

First option you can choose is to restart your Windows 8. And then you can see the user name and password dialog box again. But what if you don’t want take the trouble to do that? Then you can do the followings:
1. Press Windows + R key to open Run box in Windows 8.
2. Type in “cmd” in the Run box and press Enter key to open the command prompt window.
3. Type in the command: net use \\ip\ipc$ / del and press Enter key. For example, you type in “net use \\192.168.1.71\ipc$ /del” and press Enter. Then you can see the prompt information.
Now when you try to access to network shared folder again, you can see the username and password dialog box again without restarting your Windows 8. Then you can log in with another new username and password.

Friday, March 14, 2014

How to Set VMware Boot from a CD Disk


The Virtual Machine (VM) boots from its hard drive by default, but you may want to boot it from CD disk containing Windows startup files to repair your VM or to run certain software. Then how can you boot your VMware from CD disk? Sounds fresh and mysterious? Follow me to reveal it.

Step1: Open VMware Workstation. Insert a CD disk in your host computer, click on VM menu, swipe to Removable Decives > CD/DVD (IDE) and then click on Connect to connect the CD disk to the VMware.

Step 2: Click on VM menu and select CD/DVD (IDE) under Hardware tab. On the right side, tick in Connected and Connected at power on check box and then choose Use physical drive.
Step 3: Restart your VMware and change boot sequence to set CD-ROM as the first boot device.

Option One: Set from Boot Menu.
1. When the VMware is starting up, press Esc key immediately when the prompt message that Press Esc to enter Boot Menu shows. Then you can see the following screenshot.


2. Press arrow key ↓ to select CD-ROM Drive and press Enter to boot from.
Option Two: Set from BIOS Setup Utility
1. When the VMware is starting up, press F2 key immediately when the prompt message that Press F2 to enter Setup shows. Then you can see the following screenshot.
2. Press arrow key “→” to select Boot tab.
3. Press “+” key to promote CD-ROM Drive to the first place to set it as the first boot device.
4. Press F10 key to save the changes and exit.
Step 4: The VMware boots from the CD disk and loads the contents in it.
Then you can do the follow-up operations when you successfully boot your VMware from the CD disk.